
Girl Scouts: How to Make a Sit-Upon

5/25/2011
Before attending Camporee last weekend, my daughter needed a "sit-upon." If you're asking "What in the world is a sit-upon?" then you are as unfamiliar with Girl Scouts as I am!
Turns out that a sit-upon is something Girl Scouts make to sit on during camping trips or other events where they may be sitting on the ground, on wet picnic tables, etc. It's a waterproof, cushiony soft, something to sit-upon. :-)
Here are the basic steps showing how "we" (mostly me) made the one for my daughter.

Gather supplies:
- 1 foam pad (ours were 1 inch thick in a 14x14 square; bought at Hobby Lobby)
- 1 section of rope 2-3 feet long
- 1 roll duct tape (we used a good girly color like hot pink)
- some yarn and a yarn needle
- a piece of clear vinyl about 30 inches x 15 inches
- contact paper
- a hole punch and scissors
- ripped up pieces of many colors of tissue paper


Use the contact paper and the colored tissue paper pieces to make whatever designs your daughter chooses. My daughter made a neat crown and some other shapes. Some girls make flowers. It's a good idea to put your child's name somewhere inside contact paper too.
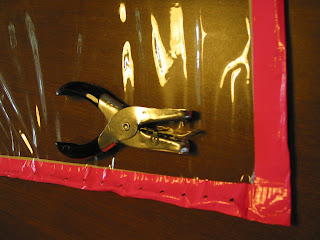 Measure your vinyl and cut it to the right size. You need it to fit around your cushion with just a little to spare on the edges. Then use your duct tape to go around all 4 edges of the vinyl. Next use your hole punch to make holds all around the 4 edges of duct tape. I tended to keep these fairly close together (1-2 finger-widths apart) so it will be stitched tighter and be more waterproof and secure. Holes further apart will mean looser stitching. Keep in mind that you need the same number of holes on the edges that will be paired up after you fold your vinyl in half. So either count them out or do a preliminary fold so you can line it up while making the holes.
 Use some of the contact paper to secure your tissue-paper designs (that look a little like stain glass now) to one side of your vinyl. This will be the inside. It will be folded in half, so decorate both halves with your tissue paper designs. It will look something like this, with the vinyl folded over but not secured yet.
 Insert your rope along the fold of the vinyl. This will be your handle, to carry your sit-upon around. Then use your yarn to stitch all the way around the 3 duct-taped edges. I used a lot of yarn for this and went around twice, to make it very secure.
 Ta-da! A sit-upon!
If this is too complicated for you, there are many other options out there for sit-upons. Some scouts just use duct tape as the waterproof outside and stuff it with newspaper for the inside fluff. There are many creative options out there!
5 comments:
Beautiful!
I've been a Girl Scout since 2nd grade (but inactive since I stopped being a leader 2 years ago) and my favorite sit-upon was made from a carpet sample that had grommeted holes near one edge because it had been in one of those big notebooks of carpet samples. Just put a rope through the 2 holes closest to the corners and tie it around yourself with the carpet side out! It was easy to tell whose was whose because all the samples in the book were different.
Interesting how these have evolved throughout the years. When I was a Brownie scout in the early 60's we folded newspaper and weaved them together into a mat about 15"x15". Obviously we didn't used these on wet ground!
My daughter's Daisy troop had a camp-out activity to make these. They used squares cut from plastic tablecloths for the waterproof outside and newspaper folded over cotton batting for the cushion. They used brightly colored duct tape to seal up all the sides and make a handle, then wrote their names on the outside with permanent marker.
I made my situpon in the 70's. We used newspaper that was folded and woven into a mat the covered it with vinyl that we sew closed. I used the same one for 5 years.
Thanks :) I've seen others, but not with the handle. I remember having one that we tied around our waists. this should work! (I think ribbon could work, too).
Our troop is going to make these this fall for our first campout. They're 2nd graders.
Post a Comment